The Siege of Kozuki Castle ― The Abandoned Fortress Between the Mōri and the Oda, and the End of the Amago Revival
November Tenshō 5 (1577) – July Tenshō 6 (1578) | Sayō District, Harima Province (present-day Sayō, Sayō District, Hyōgo Prefecture)
- The Siege of Kozuki Castle in Three Lines
- The Mainstream View ― The Standard Account Found in Textbooks
- Multiple Theories ― Where the Standard Account Wavers in Recent Research
- Viewed Strategically ― What the Siege of Kozuki Castle Left Behind
- Famous Words from This Battle
- Anecdotes and Episodes
- Chronology of the Siege of Kozuki Castle
- Key Figures of Both Sides
- Related Historic Sites Map
- Related Articles and References
The Siege of Kozuki Castle in Three Lines
- A struggle for a small fortress sitting at the meeting point of three provinces ― Harima, Mimasaka, and Bizen ― that changed hands repeatedly over half a year. It was the contest for the single most important frontline base in the Oda campaign against the Chūgoku region.
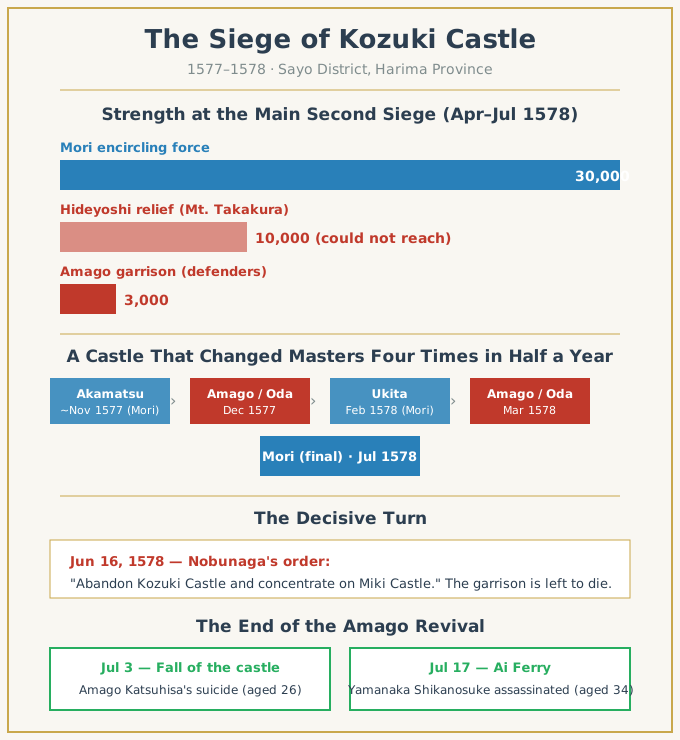
- In the second main siege (April–July 1578), the Amago revival army of some 3,000 under Amago Katsuhisa and Yamanaka Shikanosuke was surrounded by a Mōri host of 30,000. Hashiba Hideyoshi marched to relieve them, but Oda Nobunaga‘s order to prioritize Miki Castle left them to die.
- The castle fell on July 3 and Amago Katsuhisa took his own life; on July 17 Yamanaka Shikanosuke was assassinated at the Ai Ferry while being escorted away. With this, the Sengoku house of Amago was utterly extinguished.
The Mainstream View ― The Standard Account Found in Textbooks
The Strategic Value of Kozuki Castle ― The Key Point Where Three Provinces Met
Kozuki Castle, in Sayō District of Harima Province (present-day Sayō, Sayō District, Hyōgo Prefecture), was a small mountain castle, yet its position was extremely important. Standing at the border where the three provinces of Harima, Mimasaka, and Bizen met, it was the very front line where the Oda forces of the central provinces collided with the Mōri forces of the Chūgoku region. The castle itself was by no means large, but whoever held it could shift the boundary of power between the Mōri and the Oda dramatically.
In the Sengoku period Kozuki Castle was held by Akamatsu Masanori, a lord descended from the Akamatsu clan, the military governors of Harima. Behind him stood Ukita Naoie of Bizen, and the Ukita belonged to the camp of Mōri Terumoto. Kozuki Castle thus functioned, in effect, as the easternmost front line of the Mōri sphere of power.
Ever since the first Battle of Kizugawaguchi in July Tenshō 4 (1576), in which the Oda navy was defeated by the Mōri navy, the relationship between Nobunaga and the Mōri had become one of outright hostility. For Nobunaga, who was already locked in war with the Honganji, suppressing the Mōri was an absolute condition for unifying the realm, and pacifying Harima was indispensable as a forward base for that purpose. In October Tenshō 5 (1577), having finished the subjugation of Matsunaga Hisahide at Shigisan Castle, Nobunaga at last ordered Hashiba Hideyoshi to advance into Harima. Hideyoshi’s Chūgoku campaign began here.
The First Siege of Kozuki Castle ― Hideyoshi’s Pacification of Harima and the Massacre
On October 23, 1577, Hideyoshi set out for Harima. Taking Himeji Castle (the seat of Kodera ― that is, Kuroda Kanbei) as his base, he took hostages from the warrior houses of Harima, first captured Takeda Castle in southern Tajima, and installed his younger brother Koichirō (the later Toyotomi Hidenaga). Having removed the threat to the north, Hideyoshi next advanced on Fukuhara Castle in Sayō District. On November 27 he took Fukuhara Castle and killed its lord, Fukuhara Norihisa.
The next day, November 28, Hideyoshi surrounded Kozuki Castle with a force of 15,000. He seized the wells and cut off the water supply, and defeated a combined enemy of 10,000 ― the 3,000 of Ukita Naoie who rushed to the rescue together with the 7,000 of the Kozuki garrison ― driving the Ukita forces back to the border of Bizen. Having completely encircled the castle with a triple “reverse boar-fence,” Hideyoshi launched a general assault on December 3, and Kozuki Castle fell. The lord, Akamatsu Masanori, took his own life.
The treatment Hideyoshi meted out at the fall of this first siege was a cruelty recounted for generations afterward. Refusing the garrison’s pleas for mercy, the men were cut down, the non-combatant women crucified, and the children impaled and set out as a warning along the border of the three provinces of Bizen, Mimasaka, and Harima ― so record Mōri-side war chronicles such as the Intoku Taiheiki. At Fukuhara Castle, taken around the same time, more than 250 people were said to have been beheaded. The intimidating effect on the warrior houses of Harima was immense, but it is also pointed to as one of the causes of the later defection of Bessho Nagaharu.
The Amago Revival Army Enters Kozuki Castle
Hideyoshi gave the now lordless Kozuki Castle to Yamanaka Shikanosuke (Yukimori). Shikanosuke was a former retainer of the Amago of Izumo. Even after the Amago were destroyed with the fall of Gassan-Toda Castle in 1566, he had taken Amago Katsuhisa ― a branch member of the Amago house who had become a monk at Tōfuku-ji in Kyoto ― returned him to lay life, and raised him up as a banner. Since Eiroku 12 (1569) he had fought on through Izumo, Oki, Inaba, and Tajima, continuing the struggle to revive the Amago with single-minded tenacity.
In the first month of Tenshō 6 (1578), with Hideyoshi’s permission, Shikanosuke summoned Amago Katsuhisa from Kyoto to be lord of Kozuki Castle. Katsuhisa’s younger brothers Ujihisa and Michihisa, the veteran retainer Jinzai Mototsū, and others rushed to join him, and the remnant of the Amago gathered together. With Kozuki Castle in Harima as their new base, the long-cherished revival of the Amago house was at last achieved here. They also began overtures to win over the local warriors of neighboring Mimasaka.
The Ukita Counterattack and the Prelude to the Second Siege
But Ukita Naoie did not overlook Kozuki Castle once Hideyoshi’s main force had withdrawn. In January 1578 the Ukita army attacked Kozuki Castle. Shikanosuke repelled them once with a night raid, but by early February he could not hold the castle and was forced to withdraw to Himeji. In March, Hideyoshi recaptured Kozuki Castle with a large force and once again installed the Amago lord and his men. In the span of half a year, the castle had changed masters three times.
Hideyoshi then entrusted Kozuki Castle to Amago Katsuhisa and turned his own attention to the full-scale assault on Miki Castle, where Bessho Nagaharu had fortified himself. This decision would later give rise to the tragedy of Kozuki Castle.
The Defection of Bessho Nagaharu and the March of the Mōri Main Army
In February–March 1578, Bessho Nagaharu, who held great influence in eastern Harima, suddenly defected to the Mōri. At the time Nagaharu had been serving as part of the Oda camp under Hideyoshi’s command, but his defection is thought to have had compound causes: the friction between Hideyoshi and Bessho Yoshichika (Nagaharu’s uncle) at the Kakogawa council; revulsion at Hideyoshi’s cruelty in the first siege of Kozuki Castle; the resentment of a distinguished house descended from the Akamatsu governors of Harima toward “Hideyoshi the foot-soldier’s son”; and the inducements offered by the Mōri. In response to Nagaharu’s defection, the great majority of eastern Harima’s local magnates fell into line with him, and roughly 7,500 troops gathered at Miki Castle, the Bessho seat (the Miki Campaign).
The Bessho defection was a golden opportunity for the Mōri. Mōri Terumoto set out from Yoshida-Kōriyama Castle; Kobayakawa Takakage, in charge of the San’yō front, set out from Mihara Castle; and Kikkawa Motoharu, in charge of the San’in front, set out from Hinoyama Castle, all bound for the capture of Kozuki Castle. Ukita Naoie did not march himself but dispatched his younger brother Tadaie. Furthermore, the Mōri and Murakami navies deployed in the Harima Sea to blockade the coast. The total mobilized strength exceeded 30,000, overwhelmingly outclassing the Hashiba army garrisoned at Himeji Castle.
The Second Siege of Kozuki Castle ― Encirclement and Starvation
On April 18, 1578, the Mōri army began the encirclement of Kozuki Castle. Terumoto himself placed his headquarters at Bitchū Takamatsu Castle, far from the front, while the main force under Kikkawa Motoharu and Kobayakawa Takakage took direct command. Defending the castle were no more than 2,300 to 3,000 men ― Yamanaka Shikanosuke, Amago Ujihisa, Amago Michihisa, Jinzai Mototsū, and others, with Amago Katsuhisa as supreme commander.
Although the Mōri army was overwhelmingly large, it was strangely reluctant to mount aggressive attacks. They built camp-fortifications, dug deep dry moats and trenches, raised walls, and reinforced their defenses thoroughly with palisades and abatis, laying out a perfect defensive line. Day after day they continued to intimidate with conch trumpets and drums, adopting a policy of breaking the garrison’s will to fight through starvation. Yamanaka Shikanosuke sortied several times and fought valiantly, repelling the Ukita forces among others, but he could not break the Mōri ring.
In late April, Hideyoshi temporarily broke off his attack on Miki Castle and personally deployed as a relief force on Mount Takakura, east of Kozuki Castle. But his strength was only about 10,000, and he could not even approach the castle that was surrounded by 30,000 Mōri troops. Hideyoshi sent an envoy, Kamei Korenori (Shikanosuke’s son-in-law), to Katsuhisa, urging withdrawal from Kozuki Castle. But Katsuhisa and the others would not comply, and chose to continue the defense.
Nobunaga’s Decision ― “Prioritize Miki Castle”
In May, Nobunaga dispatched 20,000 men under his heir Oda Nobutada as supreme commander. Akechi Mitsuhide, Niwa Nagahide, Takigawa Kazumasu, Sakuma Nobumori, Hosokawa Fujitaka, and other leading Oda commanders all assembled, but Nobunaga’s intent lay in the capture of Miki Castle and in pinning down the Mōri army. The relief force concentrated on taking the satellite castles of Miki ― Kanki, Shikata, and Takasago ― and did not move to rescue Kozuki Castle.
On June 16, the cornered Hideyoshi went up to the capital alone to beg Nobunaga to lead a campaign in person, but Nobunaga flatly rejected this. He issued a stern order: “Abandon the relief of Kozuki Castle and concentrate at once on the assault of Miki Castle.” With this, it was settled that Kozuki Castle would be completely abandoned by the Oda house and the Hashiba army.
It was on June 26 that Hideyoshi’s army struck its camp on Mount Takakura and returned to the assault on Miki Castle. For the Amago lord and his men inside the castle, the situation was hopeless. All hope of relief was utterly cut off, and the Mōri encirclement tightened day by day. The food and water within the castle ran dry, and the will to fight gradually wasted away.
The Fall ― Amago Katsuhisa’s Suicide and the End of Yamanaka Shikanosuke
On July 1, having fought hard against the great Mōri host but with casualties mounting ever higher, Amago Katsuhisa offered to surrender and open the castle on the condition that the lives of the garrison be spared. Kikkawa Motoharu accepted. On July 3, Amago Katsuhisa took his own life within the castle. He was twenty-six. His heir Toyowakamaru, his younger brothers Ujihisa and Michihisa, and the senior retainer Jinzai Mototsū also killed themselves to follow him. The Amago house’s long-cherished dream of revival was here utterly destroyed.
Yamanaka Shikanosuke was taken prisoner and, together with his wife, children, and more than sixty retainers, was to be escorted to Bitchū Matsuyama Castle, where Mōri Terumoto’s headquarters lay. But on July 17, just before reaching Matsuyama Castle, he was assassinated at the Ai Ferry (the confluence of the Takahashi and Nariwa rivers, present-day Abe, Ochiai-chō, Takahashi, Okayama Prefecture). He was thirty-four. As to who carried it out, theories vary ― Kawamura Shinzaemon and Fukuma Hikoemon (local tradition), or retainers of Amano Motoaki (the official Takahashi city record), among others.
After Mōri Terumoto inspected Shikanosuke’s head at Bitchū Matsuyama Castle, it was sent to Ashikaga Yoshiaki at Tomonoura and inspected once more. His body was taken up and buried at the Ai Ferry by the priest Sangyū of Kansen-ji, and a burial mound (a memorial stūpa) for his torso remains at the site to this day. With Shikanosuke’s death, the Amago revival movement came to a complete end. The Amago clan, a Sengoku house that had once held eight provinces and 1.2 million koku across the San’in and San’yō, vanished from history here.
The Mōri army, meanwhile, did not press eastward after retaking Kozuki Castle, nor did it move to relieve Miki Castle. Whether to avoid overextending their supply lines, or because they judged that retaking Kozuki Castle had achieved their immediate aim, the Mōri decision was, either way, fortunate for the Oda. Hideyoshi afterward brought down Miki Castle through a year-and-a-half starvation siege (the “starving-out of Miki”) and completed the pacification of Harima. The Chūgoku campaign continued, and five years later, in June 1582, the Incident at Honnō-ji would dramatically change Hideyoshi’s fortunes.
Multiple Theories ― Where the Standard Account Wavers in Recent Research
Theory 1: How Many Battles Does “the Siege of Kozuki Castle” Refer To?
The engagement generally called “the Siege of Kozuki Castle” was in fact not a single battle. It is a collective term for a complex cluster of fighting in which the castle was contested three times over half a year.
The First Siege of Kozuki Castle (November 1577): Hashiba Hideyoshi versus Akamatsu Masanori plus Ukita Naoie. Hideyoshi seized the wells, repelled the Ukita relief force, and then took the castle by general assault on December 3. An important victory in Hideyoshi’s campaign to pacify Harima.
The Prelude to the Second Siege (January–March 1578): Ukita Naoie versus Yamanaka Shikanosuke, then Hideyoshi versus Ukita. A fierce contest in which the master changed twice in three months ― the Ukita counterattack in January, Shikanosuke’s temporary withdrawal in February, and Hideyoshi’s recapture in March. Researchers differ as to whether to include this in the “second siege” or count it separately.
The Main Second Siege of Kozuki Castle (April–July 1578): The 30,000 of Mōri Terumoto, Kikkawa Motoharu, and Kobayakawa Takakage versus the 3,000 of Amago Katsuhisa and Yamanaka Shikanosuke. This is the core of “the Siege of Kozuki Castle” treated in this article, and the battle in which the Amago clan perished.
In other words, this was an extraordinary battlefield where the same castle changed owners four times in half a year. When speaking of “the Siege of Kozuki Castle,” one must take care which engagement is meant by the context. When told as the tragedy of Yamanaka Shikanosuke and Amago Katsuhisa, the second main siege is central; when told as Hideyoshi’s campaign to pacify Harima, the first siege is central.
Theory 2: The Massacre at the First Siege ― Historical Fact, or Embellishment in the Intoku Taiheiki?
The cruelty Hideyoshi is said to have committed at the fall of the first siege of Kozuki Castle is debated as to its historical reality.
The content of the cruelty: According to Mōri-side war chronicles such as the Intoku Taiheiki, Hideyoshi rejected the surrender offer of Akamatsu Masanori’s garrison, seized every remaining man inside and outside the castle, cut down the men on the spot, dragged even the non-combatant women and children in a line to the border of Bizen and Mimasaka as a warning, crucified the women, and impaled the children, setting them out along the border of the three provinces. At Fukuhara Castle, taken around the same time, more than 250 were said to have been beheaded.
The view that it is “fact”: (1) Because the intimidating effect on the Harima warrior houses was so great and the subsequent pacification of Harima proceeded smoothly, a strategy of making an example certainly existed. (2) Contemporary Mōri-side records and local traditions transmit the cruelty through several independent channels. (3) As a treatment of a fallen castle in the Sengoku period, “rejection of unconditional surrender plus exemplary execution” follows a pattern with precedent (Nobunaga’s annihilation of the Nagashima Ikkō-ikki, the burning of Mount Hiei, and so on); it is not inconsistent for Hideyoshi to have followed Nobunaga’s policy.
The view that it is “embellishment”: (1) The Intoku Taiheiki is a war chronicle written from the Mōri viewpoint, and may have had a political motive to emphasize the cruelty of the enemy commander Hideyoshi. (2) Contemporary Oda-side primary sources (such as the Shinchō Kōki) contain no detailed account. (3) The depiction of crucified women and impaled children overlaps with the “stock cruelty motif” of Sengoku war chronicles, raising the suspicion of exaggeration.
Where the matter now rests: The cautious view among researchers is that “some harsh treatment did take place,” that “the specific image of bodies lined up along the three-province border may be embellishment,” and that “whether it was Hideyoshi’s own judgment or Nobunaga’s instruction is unknown.” In any case, it is highly likely that this event cast a great shadow over the minds of the Harima warrior houses, beginning with Bessho Nagaharu, and became a remote cause of the fierce resistance in the later Miki Campaign.
In later years Hideyoshi, as ruler of the realm, would cultivate an image of “the man who won hearts” and of “lenient treatment,” but the Hideyoshi of the Harima pacification period had another face ― that of a cold-blooded field commander who faithfully reproduced Nobunaga’s severity. The massacre at the first siege of Kozuki Castle is given importance in modern research as an event that reveals this other side of Hideyoshi.
Theory 3: Nobunaga’s Decision to Abandon Kozuki Castle ― Strategic Rationality or Cold-Blooded Sacrifice?
Nobunaga’s decision on June 16 to reject Hideyoshi’s plea for a personal campaign and to order “Abandon Kozuki Castle and concentrate on capturing Miki Castle” has often been criticized in later ages as “a cold-blooded sacrifice.” In recent research, however, the view that it was a rational decision grounded in the strategic situation of the time has also gained strength.
The view of “cold-blooded sacrifice”: (1) Amago Katsuhisa and Yamanaka Shikanosuke were defending Kozuki Castle as part of the Oda camp. To abandon them after they had refused the offer to withdraw was a breach of faith. (2) The Amago were valuable collaborators for the Oda house in its war against the Mōri. Casting them aside may have damaged the trust of the various forces that had cooperated with the Oda. (3) That Hideyoshi himself begged for a personal campaign shows that as field commander he judged relief to be possible. Nobunaga’s decision was out of step with the sense on the ground.
The view of “strategic rationality”: (1) By 1578 the center of gravity of the Oda–Mōri front had already shifted to Miki Castle. If eastern Harima collapsed through Bessho Nagaharu’s defection, Mōri power would press right up to the doorstep of the central provinces. Prioritizing Miki Castle over Kozuki Castle was strategically sound. (2) Kozuki Castle was, after all, only a small fortress, and there was little prospect of winning with a relief force of 10,000 against 30,000 Mōri. Failure would only enlarge the Oda army’s losses. (3) In the north, Uesugi Kenshin was planning a march on the capital (unrealized owing to his sudden death in March 1578), and the Oda had no room for a two-front war. They had to concentrate resources in one place. (4) Above all, Nobunaga was a rationalist who coldly distinguished between “disposable” and “protected” assets. The Amago had value as a symbol of the revival movement, but they were not a main force in a full-scale war against the Mōri.
Historical assessment: In hindsight, Nobunaga’s decision may be called correct. Hideyoshi, who spent a year and a half bringing down Miki Castle, afterward completely pacified Harima and pushed the Chūgoku campaign forward. Had it not been for the interruption caused by the Incident at Honnō-ji, the conquest of the Mōri would have been only a matter of time. On the other hand, the “Oda cold-bloodedness” displayed by the abandonment of Kozuki Castle may have left a subtle mark on relations with various forces thereafter. Some hold that one remote cause of the Incident at Honnō-ji was “the retainers’ anxiety at Nobunaga’s coldness,” and the abandonment of Kozuki Castle is counted as one symbolic example.
Nobunaga’s standard of judgment as a Sengoku warlord clearly prioritized “the rationality of the overall strategy” over “individual good faith.” The abandonment of Kozuki Castle is given weight in modern research as the event that most vividly reveals this strategic thinking of Nobunaga’s.
Theory 4: Why Did Amago Katsuhisa and Yamanaka Shikanosuke Not Obey the Order to Withdraw?
Even though Hideyoshi sent Kamei Korenori as an envoy urging withdrawal from Kozuki Castle, Katsuhisa and the others refused and chose to hold out. Why did they not take the road of “biding their time for a comeback”?
1) The long-cherished dream of Amago revival (the standard explanation): For Katsuhisa, Shikanosuke, and the rest, Kozuki Castle was the “base for the revival of the Amago house” that they had finally obtained after more than a decade of wandering and struggle. To abandon it once was to return to a wandering existence dependent again on the Oda and Hideyoshi. This emotional, symbolic reason fits with the image of Shikanosuke as a man of tenacity who is said to have prayed to the crescent moon, “I beg you, grant me the seven hardships and the eight sufferings.”
2) The difficulty of securing a line of retreat: With the Mōri and Murakami navies blockading the Harima Sea and the Mōri and Ukita armies encircling them on land, it was tactically difficult to withdraw 3,000 men in good order. To leave the castle and meet the enemy in the open field risked being trampled by 30,000 Mōri troops. There is room to judge that continuing the defense and gambling on Hideyoshi’s relief offered a better chance of survival.
3) A strategy of negotiating to spare the garrison: From the fact that Katsuhisa ultimately extracted from Kikkawa Motoharu a promise to spare the garrison in exchange for his own suicide, it is possible that from the start he kept the card of a final mercy negotiation in hand. To accept withdrawal risked annihilation in a pursuit; by continuing the defense and forcing attrition on the Mōri, he may have calculated that he could in the end draw out terms of mercy.
4) Distrust of the Oda side: Hideyoshi’s recommendation to withdraw was conveyed through the envoy Kamei Korenori, but relief by Nobunaga himself was uncertain. Katsuhisa and the others may have seen through to the possibility of being discarded as “no longer of use once you have withdrawn.” Indeed, Nobunaga had already abandoned relief on June 16, almost the same time as Hideyoshi’s recommendation to withdraw. There was no guarantee that Oda support would continue even if they retreated.
5) The pride and honor of the samurai (a later assessment): In the war tales and storytelling of the Edo period and after, the choice of Katsuhisa and Shikanosuke was idealized as “the pride of the samurai” and “a symbol of loyalty.” The tragic quality of Yamanaka Shikanosuke was emphasized in later works such as the Ehon Taikōki and the Taikō Shinkenki, and from the Meiji era he appeared in moral-education textbooks as a model of “loyalty to one’s lord and love of country.” This, however, is a later interpretation and does not directly reveal their motives at the time.
In reality it is reasonable to think these factors were compounded. The “long-cherished dream of Amago revival (an emotional reason),” “the difficulty of a tactical withdrawal (a rational reason),” and “distrust of the Oda (a strategic reason)” overlapped, and Katsuhisa and Shikanosuke chose to hold the castle. Their choice was not reckless; it was very likely the best move available under hopeless circumstances.
Theory 5: The End of Yamanaka Shikanosuke ― Who Killed Him at the Ai Ferry, and Why?
On July 17, 1578, Yamanaka Shikanosuke, having surrendered to the Mōri, was assassinated at the Ai Ferry (the confluence of the Takahashi and Nariwa rivers, present-day Abe, Ochiai-chō, Takahashi, Okayama Prefecture) while being escorted with his wife, children, and more than sixty retainers to Mōri Terumoto’s headquarters at Bitchū Matsuyama Castle. Several theories stand side by side concerning the perpetrator, the one who ordered it, and the motive.
Theories on the perpetrator:
(1) The Kawamura Shinzaemon and Fukuma Hikoemon theory (local tradition, the Chūgoku Heiranki): Shikanosuke crossed to the far bank in the very first boat and sat on a rock awaiting his retainers. There Kawamura Shinzaemon sprang out from behind the embankment and slashed him from behind across the shoulder. Gravely wounded, Shikanosuke plunged into the river and tried to cross to the far bank, but Shinzaemon pursued him; Fukuma Hikoemon, too, leaped in, and they grappled in midstream until at last Hikoemon took his head in close combat ― a dramatic tradition.
(2) The theory of Amano Motoaki’s retainers (the official Takahashi city record): “His sincerity in submitting to the Mōri was doubted, and Amano Motoaki ordered his retainers to kill him.” This account in regional public records and on-site signboards suggests a more organized assassination.
Theories on who ordered it:
(1) The Mōri Terumoto order theory: Terumoto himself ordered the killing on the grounds that to let Shikanosuke live would leave the seeds of future trouble. The most straightforward explanation, but the political risk of Terumoto openly ordering “the execution of one who had surrendered” was great.
(2) The theory of independent action by retainers without Terumoto’s knowledge: Retainers (Amano Motoaki and others) who read Terumoto’s wishes carried it out on their own. This way Terumoto could outwardly feign “sparing one who had surrendered.” A standard method of assassination in the Sengoku period.
(3) The Ashikaga Yoshiaki order theory: The former shogun Ashikaga Yoshiaki, who had then fled to Tomonoura under Mōri protection, did not look kindly on Shikanosuke for siding with the Oda and ordered his killing. This is consistent with the tradition (the official Takahashi city record) that Shikanosuke’s head was carried to Tomonoura and underwent Yoshiaki’s inspection, though whether Yoshiaki held such real power is doubtful.
Why kill one who had surrendered: As general reasons for Sengoku assassination, the following are cited: (1) fear that an excellent commander, kept alive, would revive the cause in future; (2) the wish to dishearten the Amago remnant by extinguishing Shikanosuke’s popularity and charisma; (3) a clear declaration of hostility toward the Oda camp. Yamanaka Shikanosuke was called “the unicorn-foal of the San’in” and was rated, even in his lifetime, as “surpassing Kusunoki Masashige.” To keep him alive and send him to Osaka or Kyoto would have made him propaganda material for the Oda and damaged Mōri prestige. Seen thus, assassination during the escort was a choice that made political and military sense.
After Mōri Terumoto inspected Shikanosuke’s head at Bitchū Matsuyama Castle, it was sent to Ashikaga Yoshiaki at Tomonoura and inspected once more. His body was taken up and buried at the Ai Ferry by the priest Sangyū of Kansen-ji, and a burial mound for his torso remains at the site to this day. Other grave sites of Shikanosuke are also recorded at Kōsei-ji in Shikano, Tottori City (built in later years by Kamei Korenori) and at Tomonoura in Fukuyama City. The end of “the unicorn-foal of the San’in” is still handed down as a tragedy of Sengoku assassination.
Theory 6: The Connection Between Bessho Nagaharu’s Defection and the Siege of Kozuki Castle
The defection of Bessho Nagaharu in February–March 1578 was an important event directly linked with the Siege of Kozuki Castle. Without Nagaharu’s defection, the Mōri could not have sent a great army against Kozuki Castle; and without the massacre at the first siege, it is highly likely that Nagaharu would not have defected. The two stand in a chicken-and-egg relationship.
Several theories coexist regarding Nagaharu’s reasons for defecting:
1) The Kakogawa council friction theory (the Bessho Nagaharu-ki): In May 1577, when Hideyoshi held a strategy conference against the Mōri at Kakogawa Castle (the Kakogawa council), the uncle Bessho Yoshichika and the retainer Miyake Harutada attended in Nagaharu’s place. Miyake Harutada proposed a tactic, but Hideyoshi ignored it completely, leaving deep dissatisfaction on the Bessho side ― so the war tale explains. There is also a reverse account that the Bessho side’s condescension displeased Hideyoshi, and another that Yoshichika slandered Hideyoshi to Nagaharu, saying, “If Hideyoshi is allowed to act freely, he will bring disaster upon the Bessho.”
2) The pride of a distinguished house and resentment of Hideyoshi: The Bessho were a distinguished house descended from the Akamatsu, governors of Harima. Hideyoshi, on the other hand, was a foot soldier’s son from Nakamura in Owari. By the medieval order of family rank, there was strong psychological resistance to the very idea of a distinguished house like the Bessho serving under the upstart Hideyoshi.
3) Revulsion at the massacre of the first siege: The Harima warrior houses were shocked by Hideyoshi’s treatment in the first siege ― the crucified women and impaled children ― and distinguished houses like the Bessho in particular deepened their revulsion toward “the Hideyoshi who executes fellow Harima people so cruelly.” There must also have been the fear that they would be next.
4) The influence of Jōdo Shinshū adherents: At the time there were many adherents of Jōdo Shinshū (the Ikkō sect) in Harima, and amid Nobunaga’s war with the Honganji, anti-Nobunaga sentiment had spread. Many Jōdo Shinshū adherents also fortified themselves in Miki Castle, which contributed to the prolonging of the Miki Campaign.
5) The Hatano Hideharu and Mōri inducement theory: Nagaharu’s wife’s family was the Hatano Hideharu of Tanba. The Hatano had already raised the banner of revolt against Nobunaga in January 1576 (obstructing Mitsuhide’s conquest of Tanba). Cooperation with his wife’s family, together with active inducement by the Mōri, spurred Nagaharu’s defection.
6) The internal power struggle within the Bessho: Within the Bessho there was conflict between the pro-Oda Shigemune (Nagaharu’s uncle) and the anti-Oda Yoshichika (Nagaharu’s other uncle). In the end the Yoshichika faction prevailed and the defection was decided. Shigemune did not go along with the defection and remained in the Oda camp.
These factors most likely acted not singly but in combination to produce the Bessho defection. And Nagaharu’s defection made possible the march of the Mōri main army, with the result that Kozuki Castle was surrounded by a host of 30,000. Conversely, from the Mōri side, the exemplary executions at Kozuki Castle prepared the psychological ground for the Bessho defection. The two were mutually linked as a “compound anti-Oda chain reaction” in the Oda campaign to pacify Harima.
Viewed Strategically ― What the Siege of Kozuki Castle Left Behind
A Lesson as the Prototype of the “Great Return from the Chūgoku”
The decision to abandon Kozuki Castle was a bitter experience for Hideyoshi. The fact that he had left an ally of his own to die must have cast a deep shadow over his psychology as a commander. Yet at the same time this experience taught Hideyoshi both “the cold-bloodedness to sacrifice an individual front for the sake of the overall strategy” and “the mobility to switch the situation in a short time.” Four years later, in June 1582, the prototype of the “Great Return from the Chūgoku” ― immediately breaking off at Bitchū Takamatsu Castle through a negotiated peace, covering 200 kilometers in ten days, and winning the Battle of Yamazaki ― may be said to lie in the speed of judgment cultivated by the experience of abandoning Kozuki Castle.
Paradoxically, it was precisely because Hideyoshi had watched Nobunaga’s cold-blooded decisions at close range that, after Nobunaga’s death, he could seize the realm through swift and bold judgment. The Siege of Kozuki Castle was also an important learning opportunity that honed the command ability of the future ruler Hideyoshi.
The Sealing of the Amago’s Destruction and the Prolonging of the Chūgoku Front
With the fall of Kozuki Castle and the assassination of Yamanaka Shikanosuke, the Sengoku house of Amago was utterly destroyed. A distinguished house that had once held eight provinces and 1.2 million koku across the San’in and San’yō vanished from history here. The Amago revival movement, which had continued for twelve years since the fall of Gassan-Toda Castle in 1566, was also brought to an end. Shikanosuke’s death was an event that symbolized the close of the Sengoku-era “house revival movement.”
The Mōri, meanwhile, halted their eastward advance after retaking Kozuki Castle and did not push further into the Oda sphere of power. As a result the Oda–Mōri front bogged down in eastern Harima, and a decisive outcome between the two armies was deferred until the Incident at Honnō-ji in 1582. Had the Mōri ridden the momentum of retaking Kozuki Castle toward the relief of Miki Castle, Oda control of Harima might have collapsed. The Mōri decision to “stop at retaking Kozuki Castle” gave the Oda, in the end, room to breathe, and led to the success of Hideyoshi’s starvation siege of Miki Castle.
The Making of the Yamanaka Shikanosuke Legend ― The Birth of the Hero of “Seven Hardships and Eight Sufferings”
The tragic end of Yamanaka Shikanosuke left a powerful impression on later ages. The episode of his praying to the crescent moon, “I beg you, grant me the seven hardships and the eight sufferings”; his lone struggles at Gassan-Toda and Kozuki Castle; his assassination at the Ai Ferry ― these elements combined, and from the Edo period onward Shikanosuke came to be greatly celebrated in storytelling and war tales as “a model of loyalty” and “an indomitable hero.”
Works centered on Shikanosuke ― the Ehon Taikōki, the Taikō Shinkenki, the Amago Jūyūshi (The Ten Brave Warriors of the Amago), and others ― were produced one after another, and his popularity was transmitted across the ages. In the Meiji period he was adopted into moral-education textbooks and incorporated into national education as a symbol of “loyalty to lord and love of country.” Down to the present, his popularity remains deep-rooted in the San’in region, and many historic sites, bronze statues, and grave sites remain in places associated with him ― Izumo, Oki, Yonago, Shikano, and others.
Paradoxically, it was being left to die at Kozuki Castle that became the occasion for engraving Shikanosuke into history. Had he withdrawn and bided his time for a comeback, he would likely have been buried in history as “merely another wandering warrior.” It was precisely his tragic end that made Shikanosuke an immortal hero.
The Structure of an Oda Regime That Produced “Throwaway Pieces”
The Siege of Kozuki Castle vividly showed that the Oda regime had a constitution that “cast aside individual collaborators for the sake of the overall strategy.” The Amago were a valuable anti-Mōri collaborator for the Oda, but once judged “disposable” on strategic grounds, they were cast aside without mercy. Similar examples ― the extermination of the Nagashima Ikkō-ikki, the burning of Mount Hiei, the expulsion of Ashikaga Yoshiaki ― recurred throughout Nobunaga’s life.
This cold-bloodedness of the Oda regime made efficient unification of the realm possible, but on the other side it bred deep anxiety among retainers and allies. Some researchers cite, as a remote cause of the Incident at Honnō-ji, the fear among senior retainers that “one never knew when one might oneself be cast aside.” The treason of Akechi Mitsuhide, the defection of Araki Murashige, the revolt of Bessho Nagaharu ― all of these may also be interpreted as some kind of reaction to the cold-bloodedness of the Oda regime. The abandonment of Kozuki Castle was one of the examples that most vividly showed this structural “coldness” of the Oda regime.
Famous Words from This Battle
“I beg you, grant me the seven hardships and the eight sufferings.”
The famous words Yamanaka Shikanosuke is said to have prayed, facing the crescent moon. It is said that for the sake of the revival of the Amago house, he prayed to the moon to be given every hardship upon his own body. Whether this line was actually transmitted from his own time cannot be confirmed, but it was widely told in later storytelling and war tales and became the phrase that symbolizes Shikanosuke as “the indomitable hero.”
“I am grateful that we could revive the house of Amago, even for a moment.”
Words Amago Katsuhisa is said to have conveyed to Yamanaka Shikanosuke at the fall of Kozuki Castle. After twelve years of wandering together with Shikanosuke since the fall of Gassan-Toda Castle in Eiroku 9 (1566), it is gratitude for having been able to hold Kozuki Castle as “a castle of the Amago house,” if only for half a year. The weight of a gratitude worth a hundred thousand koku is contained in this single phrase.
“Abandon Kozuki Castle, and take Miki Castle.”
The sense of the order Nobunaga is said to have issued on June 16, 1578, when he rejected Hideyoshi’s plea for a personal campaign. It symbolizes Nobunaga’s strategic thinking, which cold-bloodedly cast aside an allied Amago lord and his men. It is given importance in modern research as an event that shows the essence of the Oda regime, which prioritized “the overall strategy” over “individual good faith.”
“Sutegamari” (the self-sacrificing rearguard).
A word used in later ages to refer to the fate of the Amago lord and his men at the Siege of Kozuki Castle. “Sutegamari” means “to sacrifice oneself for the sake of the whole.” The structure by which the Hideyoshi army abandoned Kozuki Castle in order to concentrate on Miki Castle was handed down as an example that symbolizes the strategic thinking of the Sengoku period. Though not a contemporary word, it is famous as an expression that distills the historical significance of the Siege of Kozuki Castle.
Anecdotes and Episodes
1. An Extraordinary Castle That Changed Masters Four Times in Half a Year
The lord of Kozuki Castle changed with extraordinary speed over the course of half a year: (1) before November 1577, Akamatsu Masanori (Mōri side) → (2) December 1577, Yamanaka Shikanosuke and Amago Katsuhisa (Oda side) → (3) February 1578, Ukita Naoie (Mōri side, a temporary recapture) → (4) March 1578, Amago Katsuhisa and Yamanaka Shikanosuke (Oda side, who took it back) → (5) July 1578, the Mōri (the final recapture). A Sengoku-era castle whose master changed this frequently is rare, and it speaks to the high strategic value of Kozuki Castle and the fluidity of the Oda–Mōri front.
2. The First Siege as a Prototype of “Water Attack”
The cutting of the water source by seizing the wells, which Hideyoshi employed at the first siege of Kozuki Castle, was a tactic that may be called a prototype of the later water attack on Bitchū Takamatsu Castle (1582). Hideyoshi knew well the power of “supply blockade” in siege warfare, and throughout his life he made frequent use of starvation and water attacks ― at Kozuki, at Miki, at Tottori (the “starving-out of Tottori”), and at Bitchū Takamatsu. The Siege of Kozuki Castle was also a starting point from which Hideyoshi’s “wisdom of siege warfare” came to be systematized.
3. Kamei Korenori ― The Son-in-Law Who Witnessed His Master’s Death
Kamei Korenori, whom Hideyoshi sent as the envoy recommending withdrawal from Kozuki Castle, was the son-in-law of Yamanaka Shikanosuke. Shikanosuke had once been adopted into the Kamei, a senior retainer house of the Amago, and for a time took the name “Kamei Jinjirō”; through that connection he took Kamei Korenori as his son-in-law. What must Korenori have felt, going to tell the man who was both his father-in-law and his master, “Please withdraw”? Korenori afterward served Hideyoshi, sided with the Eastern Army at Sekigahara to become a daimyō, and held Shikano in Inaba Province at 38,000 koku. To mourn Shikanosuke he built Kōsei-ji on Mount Shikano, gathering several fragments of Shikanosuke’s remains to make a grave within its grounds. As the one being who carried on Shikanosuke’s wishes, he continued for generations to bear the rites associated with the house of Amago.
4. The Solitude of Hideyoshi Standing on Mount Takakura
On May 4, 1578, Hideyoshi deployed on Mount Takakura, east of Kozuki Castle, with 10,000 men. Kozuki Castle, visible below, was completely surrounded by 30,000 Mōri troops ― an enemy three times the size of Hideyoshi’s own army ringed the castle. Hideyoshi, having rushed to the rescue, must have felt keenly his own powerlessness to do anything. The cold-blooded judgment of the later ruler Hideyoshi was in part honed by this experience on Mount Takakura of “being able only to watch.” The ruins of the Mount Takakura fort remain in Sayō today, and one can gaze out at the Kozuki Castle that Hideyoshi watched.
5. The Trap at the Ai Ferry ― The Details of Shikanosuke’s Assassination
The details of Shikanosuke’s assassination as told by the Chūgoku Heiranki are dramatic. Shikanosuke crossed to the far bank in the very first boat and sat on a rock awaiting his family and retainers. Next a boat carrying his wife, children, and household was again pushed out into the river, but because the escort had pulled the plug, the boat began to sink. Watching his wife and children cry out, Shikanosuke raged with fury. There the retainers of Amano Motoaki (or Kawamura Shinzaemon and the others), who had hidden in the shadow of the embankment, sprang out and slashed him from behind across the shoulder. The cold cruelty of cutting down his wife and children along with him may be called a typical case of Sengoku assassination. There is also a tradition that Shikanosuke’s wife and children were all killed at the Ai Ferry, suggesting an intent to sever the very bloodline of the house of Amago.
6. Shikanosuke’s Head, to Tomonoura ― The Encounter with Ashikaga Yoshiaki
After undergoing Mōri Terumoto’s head inspection at Bitchū Matsuyama Castle, the assassinated Shikanosuke’s head was sent all the way to Ashikaga Yoshiaki at Tomonoura in Bingo (present-day Fukuyama, Hiroshima Prefecture). Tomonoura was the place where the former shogun Yoshiaki, expelled by Nobunaga in 1576, had set up the “Tomo shogunate” under the protection of the Mōri. Yoshiaki inspected Shikanosuke’s head and confirmed the death of the enemy commander. To Yoshiaki, Shikanosuke was “a traitor who had sided with the Oda,” yet he may have felt complex emotions at Shikanosuke’s indomitable way of fighting. Shikanosuke’s head-mound remains at Tomonoura to this day.
7. The Priest of Kansen-ji ― A Nameless Memorial
The body of Shikanosuke, assassinated at the Ai Ferry, was taken up and buried by the abbot of the nearby Sōtō-sect temple Kansen-ji, the priest Sangyū. To take up the body of an enemy commander was a politically risky act, but it is said that Sangyū mourned Shikanosuke out of regard for his character. Shikanosuke’s torso-mound remains in the grounds of Kansen-ji today. That the grievous end of “the unicorn-foal of the San’in” was watched over by the mercy of a nameless priest ― this story is carefully handed down in the locality as an episode that conveys the religious sense and human feeling of the people of the Sengoku period.
8. Bessho Nagaharu and the Chain of Kozuki Castle ― A Tragedy of Reaction
How did Bessho Nagaharu take the outcome of the Siege of Kozuki Castle? When he defected in February–March 1578, Nagaharu expected Mōri support. Indeed, the Mōri sent a great army to Kozuki Castle and succeeded in retaking it. But the Mōri pressed no further east and did not come to relieve Miki Castle. After nearly two years of siege, Nagaharu took his own life in January 1580 in exchange for sparing his garrison. At the end of the gruesome starvation siege known as the “starving-out of Miki,” Nagaharu left a death poem: “Now I bear no grudge at all, for I think of this body of mine as one given in place of the lives of all the people.” The Siege of Kozuki Castle and the Miki Campaign are handed down together as two linked tragedies in the Oda pacification of Harima.
Chronology of the Siege of Kozuki Castle
| Year | Date | Event |
|---|---|---|
| Eiroku 9 (1566) | 11th month | Gassan-Toda Castle falls; Amago Yoshihisa surrenders to Mōri Motonari; the Sengoku house of Amago is destroyed for the time being |
| Eiroku 12 (1569) | 6th month | Yamanaka Shikanosuke returns Amago Katsuhisa to lay life and raises the banner of Amago revival |
| Tenshō 4 (1576) | 7th month | The Mōri navy defeats the Oda navy at the first Battle of Kizugawaguchi; full-scale conflict begins between Nobunaga and the Mōri |
| Tenshō 5 (1577) | 10/23 | Hashiba Hideyoshi begins his advance into Harima and enters Himeji Castle |
| Tenshō 5 (1577) | 11/27 | Fukuhara Castle falls; its lord Fukuhara Norihisa is killed |
| Tenshō 5 (1577) | 11/28 | The first siege of Kozuki Castle begins; Hideyoshi surrounds it with 15,000 and repels the 3,000 of Ukita Naoie |
| Tenshō 5 (1577) | 12/3 | General assault of the first siege; Kozuki Castle falls; Akamatsu Masanori takes his own life. The crucifixion of women and impaling of children |
| Tenshō 6 (1578) | 1st month | At Shikanosuke’s invitation, Amago Katsuhisa enters Kozuki Castle; the Amago revival army gathers |
| Tenshō 6 (1578) | 1st–2nd month | Ukita Naoie counterattacks; Shikanosuke repels him once but withdraws to Himeji in the 2nd month |
| Tenshō 6 (1578) | 2nd–3rd month | Bessho Nagaharu defects from the Oda; the forces of eastern Harima gather at Miki Castle |
| Tenshō 6 (1578) | 3rd month | Hideyoshi retakes Kozuki Castle; the Amago lord and his men re-enter |
| Tenshō 6 (1578) | 3/29 | Hideyoshi begins the encirclement of Miki Castle; the Miki Campaign begins in earnest |
| Tenshō 6 (1578) | 4/18 | The main second siege of Kozuki Castle begins; 30,000 Mōri surround Kozuki Castle |
| Tenshō 6 (1578) | 5/4 | Hideyoshi deploys on Mount Takakura with 10,000; he checks the Mōri but can do nothing |
| Tenshō 6 (1578) | 5th month | A relief force of 20,000 arrives under Oda Nobutada as supreme commander, with Akechi Mitsuhide, Niwa Nagahide, Takigawa Kazumasu, and others; it focuses on taking the satellite castles of Miki |
| Tenshō 6 (1578) | 6/16 | Nobunaga abandons the relief of Kozuki Castle and sternly orders the priority of Miki Castle; Hideyoshi leaves Kozuki Castle to die |
| Tenshō 6 (1578) | 6/26 | Hideyoshi’s army strikes its camp on Mount Takakura and returns to the assault on Miki Castle |
| Tenshō 6 (1578) | 7/1 | Amago Katsuhisa offers to open the castle and surrender on condition that the garrison be spared |
| Tenshō 6 (1578) | 7/3 | Amago Katsuhisa takes his own life (aged 26); his heir Toyowakamaru, his brothers Ujihisa and Michihisa, and Jinzai Mototsū kill themselves |
| Tenshō 6 (1578) | 7/17 | Yamanaka Shikanosuke is assassinated at the Ai Ferry during his escort (aged 34); his body is taken up and buried by the priest Sangyū of Kansen-ji; his head is sent to Ashikaga Yoshiaki at Tomonoura |
| Tenshō 8 (1580) | 1/17 | Miki Castle falls; Bessho Nagaharu takes his own life; the “starving-out of Miki” ends |
| Tenshō 10 (1582) | 6/2 | The Incident at Honnō-ji; Nobunaga dies; the Chūgoku campaign is interrupted and Hideyoshi turns toward his bid for the realm |
* Dates are given in the old (lunar) calendar.
Key Figures of Both Sides
The Mōri Side (Besieging Force, 30,000)
| Role | Person | Part Played |
|---|---|---|
| Supreme commander | Mōri Terumoto | Head of the main Mōri house; placed his headquarters at Bitchū Takamatsu Castle. Grandson of Motonari; later commander-in-chief of the Western Army at Sekigahara |
| San’yō army command | Kobayakawa Takakage | Third son of Motonari; one wing of the “Mōri Two Rivers”; later one of the Five Elders of the Toyotomi regime |
| San’in army command | Kikkawa Motoharu | Second son of Motonari; one wing of the “Mōri Two Rivers”; a fierce general of great valor. Ultimately accepted Katsuhisa’s surrender |
| Bizen front | Ukita Naoie | Sengoku warlord of Bizen; opponent in the first siege. For the main siege he dispatched his brother Tadaie |
| San’in supporter | Amano Motoaki | The Mōri retainer said to bear responsibility for executing the escort and assassination of Yamanaka Shikanosuke |
The Oda Side (Relief Force, 10,000–20,000)
| Role | Person | Part Played |
|---|---|---|
| Supreme commander | Oda Nobunaga | Sternly ordered the abandonment of Kozuki Castle on June 16; the strategic decision-maker who prioritized Miki Castle |
| Field commander-in-chief | Hashiba Hideyoshi | Commander-in-chief of the Chūgoku campaign; victor of the first siege; gave up the relief in the second siege |
| Relief supreme commander | Oda Nobutada | Nobunaga’s heir; led the 20,000-strong relief force but devoted it to taking the satellite castles of Miki |
| Leading relief commander | Akechi Mitsuhide | Parallel to his conquest of Tanba; took part in capturing satellite castles such as Kanki |
| Hideyoshi’s strategist | Takenaka Hanbei | Hideyoshi’s adviser; served on campaign while suffering from tuberculosis. Died of illness during the Miki Campaign the next year, 1579 |
| Hideyoshi’s strategist | Kuroda Kanbei | Lord of Himeji Castle; provided the Harima base for the Hashiba army. Took over as strategist after Hanbei’s death |
| Envoy | Kamei Korenori | Yamanaka Shikanosuke’s son-in-law; envoy of the withdrawal recommendation. Later built Kōsei-ji to mourn Shikanosuke |
The Kozuki Castle Side (Defending Garrison, 3,000)
| Role | Person | Part Played |
|---|---|---|
| Supreme commander | Amago Katsuhisa | Branch member of the Amago house; returned to lay life from a monk at Tōfuku-ji in Kyoto. Took his own life on July 3 (aged 26) |
| Commander of the revival army | Yamanaka Shikanosuke (Yukimori) | Former Amago retainer, “the unicorn-foal of the San’in.” Assassinated at the Ai Ferry on July 17 (aged 34) |
| Katsuhisa’s brother | Amago Ujihisa | Katsuhisa’s younger brother; took his own life with him |
| Katsuhisa’s brother | Amago Michihisa | Katsuhisa’s younger brother; took his own life with him |
| Senior retainer | Jinzai Mototsū | Veteran retainer of the Amago; took his own life with him |
Related Forces
| Category | Person | Connection |
|---|---|---|
| Mōri side / defector | Bessho Nagaharu | A distinguished house of eastern Harima; defected from the Oda and fortified himself at Miki Castle. Took his own life in 1580 |
| Mōri side / under protection | Ashikaga Yoshiaki | The former shogun; the “Tomo shogunate” at Tomonoura. Said by tradition to have inspected Shikanosuke’s head |
Related Historic Sites Map
List of Spots on the Map (9 sites)
| Name | Location | Description |
|---|---|---|
| Site of Kozuki Castle | Sayō, Sayō District, Hyōgo Pref. | The main battlefield. A mountain castle at the border of three provinces (Harima, Mimasaka, Bizen) and the last castle of the Amago lord and his men. A memorial for the 400th anniversary of the Amago lord and his men stands on the site of the inner bailey |
| Site of Fukuhara Castle | Sayō, Sayō District, Hyōgo Pref. | Taken by Hideyoshi just before the first siege; its lord Fukuhara Norihisa was killed. Now Fukuhara Shrine |
| Site of the Mount Takakura fort | Sayō, Sayō District, Hyōgo Pref. | The hill where Hideyoshi deployed during the relief in the second siege. He looked down on Kozuki Castle but could do nothing and withdrew |
| Site of Miki Castle | Miki, Hyōgo Pref. | The seat of Bessho Nagaharu; the stage of the Miki Campaign that ran parallel to the Siege of Kozuki Castle. Fell in the “starving-out of Miki” |
| Himeji Castle | Himeji, Hyōgo Pref. | Hideyoshi’s base for the Chūgoku campaign, provided by Kuroda Kanbei. The present keep is an Edo-period renovation |
| The Ai Ferry | Abe, Ochiai-chō, Takahashi, Okayama Pref. | The place of Yamanaka Shikanosuke’s assassination, at the confluence of the Takahashi and Nariwa rivers. Shikanosuke’s grave (memorial stūpa) remains |
| Kansen-ji | Abe, Ochiai-chō, Takahashi, Okayama Pref. | The Sōtō-sect temple where the priest Sangyū took up and buried Shikanosuke, killed at the Ai Ferry. Shikanosuke’s torso-mound is here |
| Tomonoura | Tomo-chō, Fukuyama, Hiroshima Pref. | Ashikaga Yoshiaki’s “Tomo shogunate”; the place to which Shikanosuke’s head was carried for inspection. A head-mound remains |
| Site of Gassan-Toda Castle | Hirose-chō, Yasugi, Shimane Pref. | The hereditary seat of the Amago; the place of the Amago’s destruction when they surrendered to Mōri Motonari in 1566. The starting point of the revival movement |
* The map is a reference display based on present-day roads. It differs from the routes and terrain of the time.
📍 View the route on Google Maps (car / train switchable)
Related Articles and References
Related Articles in Sengoku Kassenroku
- Battles: The Miki Campaign (the parallel starvation siege of Miki Castle) / The Incident at Honnō-ji (the cause of the Chūgoku campaign’s interruption)
- Warlords (Oda side): Oda Nobunaga / Hashiba (Toyotomi) Hideyoshi / Takenaka Hanbei / Kuroda Kanbei / Akechi Mitsuhide
- Warlords (Mōri side): Mōri Terumoto / Kikkawa Motoharu / Kobayakawa Takakage / Ukita Naoie / Bessho Nagaharu / Ashikaga Yoshiaki
- Warlords (Kozuki Castle side): Yamanaka Shikanosuke
Principal References and Sources
- Primary sources: Shinchō Kōki (Ōta Gyūichi), Mōri-ke Monjo (Documents of the Mōri House), Kikkawa-ke Monjo (Documents of the Kikkawa House)
- Secondary and later sources: Intoku Taiheiki (a Mōri-side war chronicle), Chūgoku Heiranki, Un’yō Gunjikki, Taikōki, Kawasumi Taikōki, Ehon Taikōki, Taikō Shinkenki, Amago Jūyūshi, Bessho Nagaharu-ki, Harima Kagami
- Recent studies: Watanabe Daimon, ed., A Battle History of Nobunaga’s Army, 1560–1582 (Yoshikawa Kōbunkan, 2016); Owada Tetsuo, Kuroda Josui; Taniguchi Katsuhiro, Nobunaga’s Road to Conquest of the Realm; Sengoku Kassenshi Kenkyūkai, ed., Encyclopedia of Sengoku Battles, vol. 6: Kyoto, Hyōgo, Okayama (Shin-Jinbutsu-Ōraisha, 1989)
- Regional studies: local municipal histories such as the History of Sayō Town, the History of Miki City, and the History of Takahashi City
* This article is written in light of the state of research as of May 2026. Primary sources are limited regarding the massacre at the first siege of Kozuki Castle and the details of Yamanaka Shikanosuke’s assassination, and new interpretations may appear as further sources are uncovered.
コメント